Showing posts with label garlic. Show all posts

Salsa

Salsa picante! Corn chips! A good refreshing beer or a nice Margarita! Sounds like a good start for your evening.

Salsa is a very easy dip to prepare. You can adjust it to your taste, don't feel bad if you only add one chili or if you de-seed the chillies. It's fine, and it will still be tasty, and not too spicy.

Anyway, let's get started with this quick and simple salsa.


For about two cups to two cups and a half of salsa, you will need:
  • 400g of diced tomatoes*
  • A glove of garlic
  • 1/2 a big onion
  • 2 chillies
  • A handful of fresh cilantro
  • Some salt and pepper to taste
  • A spritz of lime juice


Preparation Time: 10 minutes


Start by finely dicing your ingredients; the glove of garlic, the 1/2 onion, the chillies, and the fresh cilantro.


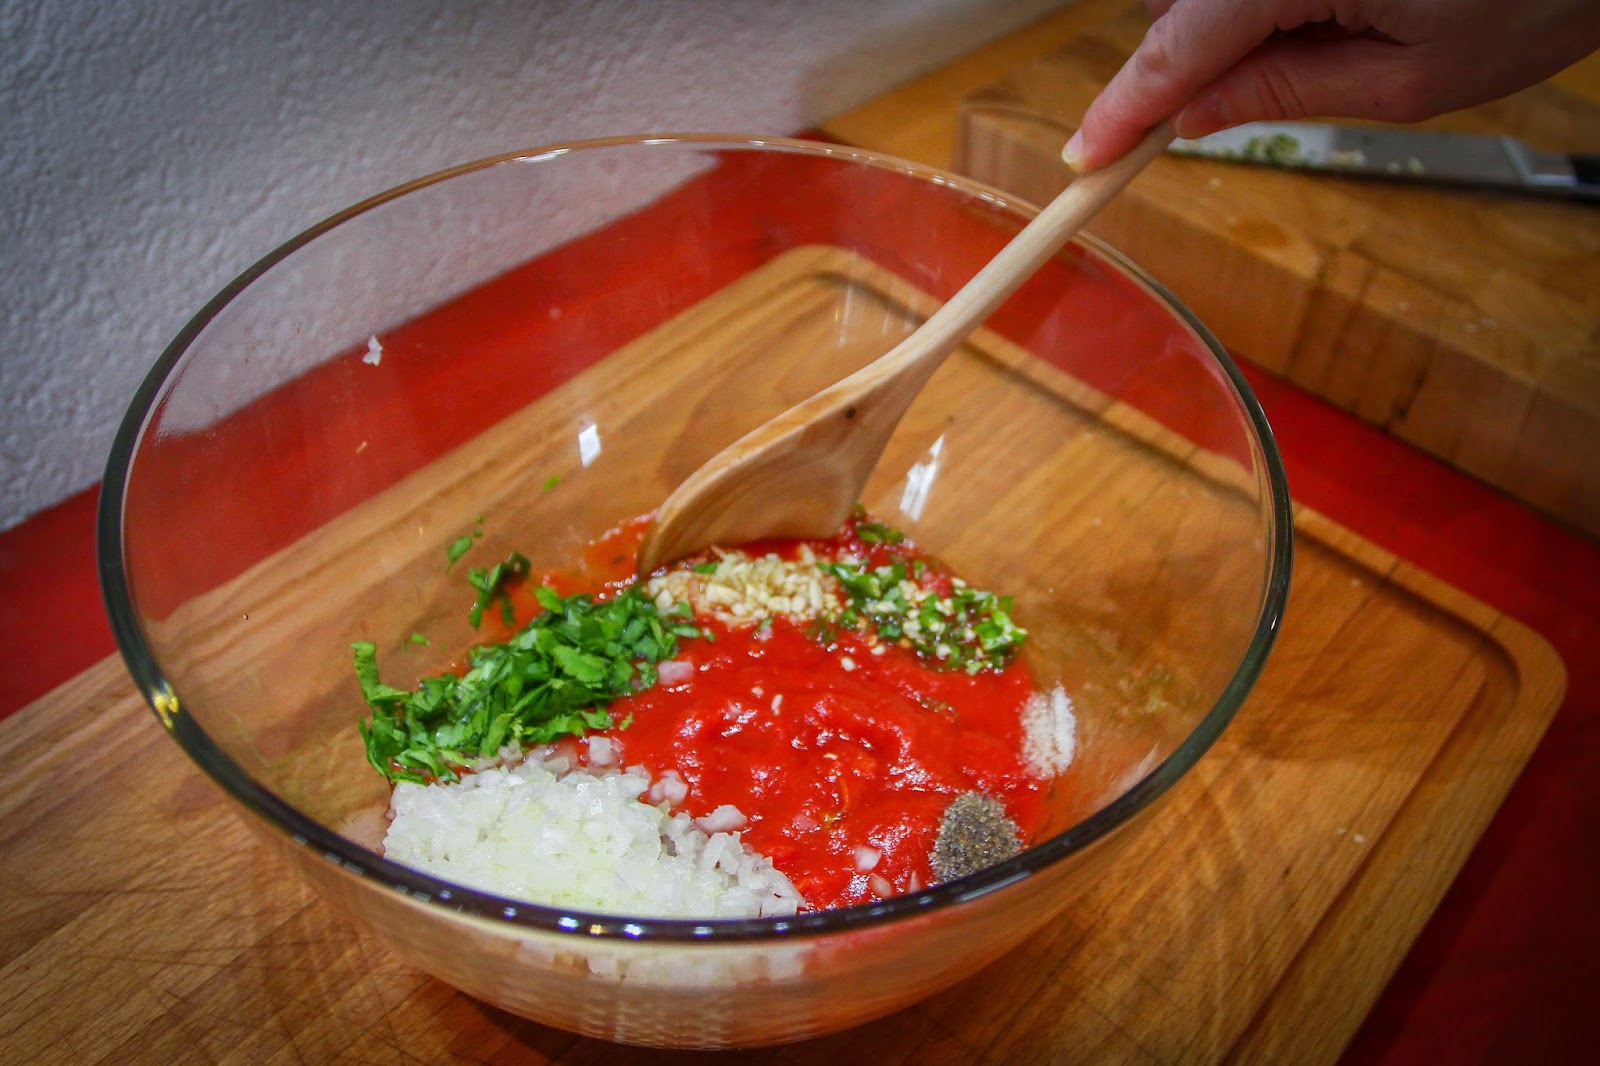
In a bowl, add your diced tomatoes, the diced ingredients, and the salt and pepper.


Mix them so that the ingredients combine nicely together.


You just made your own salsa! That's it! Wasn't it easy?! So, no more need for those pre-made jars.

Cover your bowl and keep in the fridge until serving.

Before serving, give the salsa a good stir, and add a spritz of lime juice on top.


*You can use a can of diced tomatoes, or use fresh tomatoes finely diced or crushed with a hand mixer.


Tip: If you have some salsa leftovers, use your salsa to make enchiladas. Try our Chicken Enchiladas.

You can also use it to make a spicy omelet or some spicy scrambled eggs. Or, use the salsa to give a kick to your mac & cheese.


As with all the other recipes we put on this site, this is meant to be easy to follow. We are hobby chefs who love to cook, and we are always up for learning new techniques. If you know of anything in this recipe which can be done a different way, whether for increased ease of preparation or better taste, please add a comment below!

Ham Amuse-Bouches

Having guests over doesn't always mean you have to spend your whole day in the kitchen, or even break the bank. This amuse-bouches recipe is the perfect example of a quick, easy, and inexpensive appetizer.
This recipe is as simple as it gets: really easy and it takes only few minutes to make (and half an hour to sit in the fridge before serving).

These bite-sized appetizers, made with rolled ham filled with garlic & herbs spread, are delicious and quite light too, so it will leave room to enjoy the coming meal ...


But, let me share few tips with you before starting:
  • When buying your ham, make sure the slices are one to two millimiters thick, so it doesn't tear apart when you spread the cheese.
  • Get your spread out of the fridge at least half an hour before starting, so it will be smooth and soft enough to spread.

To make this recipe, you will need:
  • Some ham
  • Some garlic & herbs spread*
  • Some foil

To calculate your quantities, you can count on making eight bites per slice of ham. Based on this assumption, the last time I made this appetizer for five people, I bought six slices of ham and a  250-gram container of garlic & herbs spread.


Place your slice of ham on a plate or cutting board ...


... and spread the garlic & herbs spread with a butter knife on the ham.


Roll your slice of ham.


Cover it completely with foil and close it.


Place in the fridge for at least half an hour.

Just before serving, remove the foil ...


... and cut your slices of ham in eight bites (don't make too small bites, because it will become messy and won't make nice bite-sized cuts).


Serve (with toothpicks) and enjoy!


*Tip: You can find this spread already made at the supermarket, by Philadelphia®, Tartare® or Boursin®, or you can make it yourself by using a plain spread, adding chopped garlic and parsley (and any other herbs you are fond of) and mix them in a blender.

As with all the other recipes we put on this site, this is meant to be easy to follow. We are hobby chefs who love to cook, and we are always up for learning new techniques. If you know of anything in this recipe which can be done a different way, whether for increased ease of preparation or better taste, please add a comment below!

Whipped by Charline Leblond

Shrimp with garlic and herb butter over pasta

Ahh, summer is finally here. No wait, not yet.        Now!        No, wait.        Yes, now!         Wait a second ...

Whatever. Summer is almost here, sometimes.

A nice refreshing summer pasta is garlic and butter tossed shrimp, sometimes called Shrimp Scampi. Again, this is a really easy way to put it together, and you could get creative by added a few other ingredients, such as chives or nutmeg. Feel free to experiment, you can't hurt the shrimp's feelings.


You will need (for two people):
  • 3-4 cloves of garlic
  • About a tablespoon of chopped parsley
  • 25 grams of butter
  • Some bread (to make garlic bread on the side)
  • Some parmesan 
  • Enough shrimp for two (I roughly assume a tight fistfull per person).
  • Pasta (follow directions on the box)

The main flavour to take from this dish is garlic, so lets start by chopping up the garlic.


Next, chop up some fresh parsley. If you don't have fresh parsley, use that dried green stuff that comes in the bottle labeled "Parsley Flakes", thats okay too.


Put your butter in a small saucepan on low-med heat and let start to melt.


Wait for the butter to meld completely and start to bubble. Wait for it ...


Add the chopped garlic and half the chopped parsley into your boiling butter.


You can let the garlic roast in the butter for as long or as short as you want; I like my garlic a bit browned, but not everybody does. Just keep monitoring your garlic, it will be soft and delicious in less than two minutes, and will brown just about after three minutes.


As soon as your garlic is browned, or done as you like, take the pan of the heat. I'm going to add some of my garlic on my halved ciabatta bread, and you can use whatever bread you want. Even sliced sandwich bread, if you like, but cut it into smaller strips so its easier to handle.


And then I'm going to top the bread with some parmesan. I'm not ready to put it in the oven yet, so I will leave it on the counter for a while, which also allows the melted butter to really permeate the bread.


Its time to start with the shrimp. I'm using uncooked but peeled shrimp. Now, shrimp cook quickly, so start your pasta boiling just before you start cooking the shrimp.


In a skillet, add some olive oil and butter, let it heat up on medium and then toss in your shrimp. Once they start turning pink, toss them around a bit and add your spices. I have added black and pink ground peppercorns; and again, feel free to experiment a bit.


The shrimp is done when it is all curled up and evenly pink.


At this stage, I'm going to add the rest of that butter and parsley I roasted, and toss them around with the shrimp. This is also a great time to put the garlic bread in the oven, just to grill it a bit to melt the cheese.


And finally, toss your cooked and drained pasta around in the shrimp and butter sauce, and serve. Top with the remaining parsley and sprinkle some parmesan if you like.


Now, I normally like my shrimp scampi served over Angel hair pasta, but I was unable to find any where I live. I personally feel that the smaller the pasta, the better for the butter.

That being said, I've seen shrimp scampi server over penne; I didn't try it so I can't opine one way or another, but the point is more that there are no rules here.

Unless you're Italian and you tell me there are rules.

Enjoy with a glass of crisp white wine.


As with all the other recipes we put on this site, this is meant to be easy to follow. We are hobby chefs who love to cook, and we are always up for learning new techniques. If you know of anything in this recipe which can be done a different way, whether for increased ease of preparation or better taste, please add a comment below!

Whipped up by Shyamal Addanki

Beef & Guinness stew

Do you like to drink Guinness?

Do you like to eat beef?

Do you like warm stew?

Would you go mad in winter if you couldn't drink a pint of Guinness while eating a warm beef stew?

Well, I may not be a doctor (technically, anyway), but fortunately I can prevent you from going mad.

I suggest a dose of Beef and Guinness Stew, with a side of Mashed Potatoes, and you should wash it down with a pint of Guinness.

You're welcome.

For about four servings, you will need the following:


  • Half an onion
  • Three cloves of garlic
  • A few springs of rosemary
  • 3-4 bay leaves
  • One pint of Guinness draught
  • One pint of beef broth
  • 4 carrots
  • Stewing beef, check with your butcher
Preparation Time: 20 minutes
Cooking time: 2-3 hours

This recipe was enough for four people and there was a bit leftover. Stew is always better the next day anyway, but don't tell that to your guests or they will be cross with you and leave - only to return inconveniently the following day just as you are about to enjoy your better stew.

Start by chopping three quarters of an onion and three cloves of garlic. Feel free to modify the onion/garlic as you prefer, you can taste the difference, but it won't kill the stew.


Next, toss your stewing beef cuts in flour. I realised post-stew that I ought to have doused my beef in more flour, so ensure that your beef looks whiter than mine.


To start cooking, toss your onions and garlic in a pot with some oil and let them fry up just a bit.


Then add the beef along with a generous sprinkle of salt and pepper.


What you want to do is to get the beef nicely browed on the outside. I had the heat on med-high, and I only wish I had used a larger frying pan initially so that I would not have had to crowd the beef.

If you're in the same position as I was, just remember to let the beef sit for a few minutes before tossing it around the pot.


I decided to chop up some rosemary, but I am also going to use some full stalks.


Along with the rosemary, toss 3-4 bay leaves into the pot.


Finally, it is time to add the wonderful blessing. [Moment of silence]

Now, I'm using Guinness draught, which I first poured into a pint glass and left to settle. The reason is that I'm going to prevent the froth from getting in the stew.

I used a full pint of Guinness in my stew (minus a few important sips for quality control). The important thing is to remember that when you pour the Guinness into the pot, use a spoon to hold back the foam. Otherwise, the foam will rise to the top of your stew and you will have to carefully spoon it out later.

As you can see on the right, the foam is left in the glass after pouring the Guinness.


So, along with the Guinness, add just shy of a pint of beef broth to the pot.
Give the whole thing a good stir and raise the heat so that it comes to a boil, then reduce to a tiny, tiny amount of heat where the broth is just simmering.

Now cover the stew and go away for a few hours. Just pop in to stir it from time to time, but leave it on the stove for at least two hours before serving. About an hour before serving time, add some sliced carrots to it (sorry, forgot to take a picture, but you know carrots, right? Long orange things with a bugs bunny on one end?).


After two hours, if your stew is still quite thin, sift a tablespoon of flour into it and mix well.

Finally, serve with mashed potatoes.


Do I really have to suggest that a pint of Guinness is a great accompaniment to a Guinness stew?

No? Well, good then; I wont.


As with all the other recipes we put on this site, this is meant to be easy to follow. We are hobby chefs who love to cook, and we are always up for learning new techniques. If you know of anything in this recipe which can be done a different way, whether for increased ease of preparation or better taste, please add a comment below!

Whipped up by Shyamal Addanki